Steampunk Spotter on-prem deployment
So you're trying out Spotter on your own air-gapped infrastructure. Wonderful!
Here's how you get started.
Warning
Upgrading Spotter from a version earlier than v5.21.0 requires a deep migration process. Please refer to Upgrading from earlier versions of Steampunk Spotter on-prem for instructions.
Quickstart
Warning
The following commands will also generate a custom file with an encryption key. If you are performing an upgrade and you have stored the file in another location, please use the original one, otherwise the encryption key might be overwritten.
# we recommend wget as it auto-resumes interrupted downloads by default
wget -O spotter.run https://cdn.spotter.steampunk.si/public/<installer>.run
chmod u+x spotter.run

df -h                         # identify location of free space

[ -f "$HOME/custom.yml" ] || echo "---
secrets_encryption_key: $(head -c 32 /dev/random | base64)" > \
  "$HOME/custom.yml"          # generate config with encryption key;
                              # save this file in a secure place for a later use!

export SPOTTER_INSTALLER_CUSTOM_VARS_FILE="$HOME/custom.yml"  # path to custom config for installer
./spotter.run --keep          # --keep extracts into ./installer/ for potential retries
                              # the installer asks you for the install location (see df -h above)
                              # on completion, instance admin credentials are printed to stdout

firefox http://<machine-ip>   # log in as an instance admin
Finalize the installation of the Steampunk Spotter web app in the browser:
- Apply the Spotter License provided to you by the Spotter team: License management.
- Customize your Steampunk Spotter experience in the Site settings.
- If your organization uses LDAP, configure LDAP integration.
- If you want Steampunk Spotter to be served with your company's TLS certificate, apply TLS settings.
Your Steampunk Spotter instance is now ready to receive scans. Users may register their accounts, log into the Steampunk Spotter web app, and generate API tokens. The following steps result in an installed Steampunk Spotter CLI:
python3 -m venv .venv/                           # a clean virtual environment is recommended
source .venv/bin/activate                        # remember to activate the venv
pip install steampunk-spotter                    # install the CLI
export SPOTTER_ENDPOINT=http://<machine-ip>/api  # point the CLI to your on-prem instance
export SPOTTER_TOKEN=<generated-token>           # auth credentials generated in the browser
spotter login                                    # test by logging in
spotter scan <path-to-playbook>.yml              # start scanning!
Slowstart
With an on-premises installation of Spotter, there are a couple of extra steps as compared to using an account on Spotter SaaS. An obvious step is installing Spotter itself, but you also need to point the CLI to your installation.
Warning
Spotter on-prem is designed to be installed in a dedicated machine.
Installing Spotter on-prem on the same server as other software may have unintended side effects.
Note
Familiarity with command-line shells is necessary for installing Steampunk Spotter.
Steampunk Spotter installer ships a portable version of Podman, which then hosts containers comprising the
application.
Running and managing the Steampunk Spotter compose will only work correctly by using the podman-portable wrapper
instead of the global podman.
Installation and runtime does not use an elevated user (i.e., rootless), but is installed and run as a regular user
instead.
Let's see how this works.
Installing Steampunk Spotter on-prem
The team will have provided you with a link to the installer.
First, download the installer.
You can use any method you want - through the browser or in the command line.
If you're using the command line, we recommend using wget as it automatically resumes the download in case
the connection drops out.
Once the installer is transferred, mark the file as executable.
While the installer is downloading, you can check where your host has sufficient free space. Find a path in your filesystem which has sufficient free space for installation and take note, as the installer will ask you for this location later in the process.
The deployment needs to be configured with an encryption key, which the application uses for encrypting sensitive information at rest such as credentials to third-party services. You are responsible for keeping the encryption key in a secure place like a password manager vault. Before installing Spotter for the first time, generate your instance's encryption key:
If openssl is not available, use the following alternative:
Save the generated output in your password manager vault.
Also, create a new YAML file that contains this secret.
We will name this file custom.yml, e.g.:
Note
Any instance restored from a backup of an original instance needs to have the same secrets_encryption_key
configured.
If the secrets_encryption_key changes, any credentials to outside services saved in the Steampunk Spotter App
will no longer work and will need to be re-entered in the App.
Custom installation variables
Set up an environment variable to provide the path of the configuration file to the installer. This needs to be an absolute path:
Trusted Certificate Authority (CA) certificates
Spotter supports custom Certificate Authority (CA) certificates for organizations that use internal or private CAs.
During installation, you can provide a path to your custom CA certificates bundle, which will be integrated into the
system's trusted certificate store.
This ensures that Spotter can securely communicate with internal services and APIs that use certificates issued by your
organization's CA.
The installer will try to find the location of the bundled system CA certificates and ask for confirmation or input a custom path during the installation itself.
Running the installer
Use the --keep argument to the installer to extract the self-extracting executable into the install/ subdirectory,
or alternatively, choose a different target with --target <dir>.
The installer first asks you where to install Spotter.
Choose any path where you have sufficient free space as identified before with df -h.
Tip
If at this or later point the installation is aborted, you can skip the lengthy decompression process.
Change to directory to where the installer unpacked its contents (install/ if you used --keep, or the chosen
directory if you used --target <dir>), then run ./installer.sh with no additional switches.
Installation takes a while, and you can monitor progress in the console. In case of errors, a verbose log file is generated and its details are printed to the console for debugging.
Upon successful installation, an instance admin is automatically created and the credentials printed into the console.
Note
Save the instance admin credentials in your password manager for later use.
Open your browser and access the Spotter host's IP address via HTTP or HTTPS and log in with your instance admin credentials.
After installation, apply the Spotter License provided to you by the Spotter team. Please refer to the License management section for guidance.
Setting up the CLI
To get started with the CLI, a comprehensive guide is available in the CLI documentation. This section includes specifics for usage with an on-prem installation of Spotter.
First, start by installing steampunk-spotter via pip on your development machine - not on the Spotter server.
We recommend using a virtual environment to prevent conflicting dependencies between applications.
This is also the recommended way of installing packages via pip.
To use the CLI, we recommend using an API token. Generate one in Spotter in your profile page and save it. Then, set the following environment variables:
Then, verify you can log in and start scanning!
Trusted Certificate Authority (CA) certificates
Note
Steampunk Spotter CLI version 5.0.0 introduced the use of the global system
store and the --cacert CACERT and --inscure or -k switches.
More information is available here.
The following advice applies to older versions of the CLI.
The Spotter CLI uses Python's requests library to perform any API exchange with the back end.
If your instance of on-prem Steampunk Spotter or an HTTPS proxy uses a certificate from a Certificate Authority (CA) that
isn't globally trusted, then spotter commands may report an error that is similar to the following:
SSLError(SSLCertVerificationError(1, '[SSL: CERTIFICATE_VERIFY_FAILED] certificate verify failed: unable to get local issuer certificate (_ssl.c:1129)'))
Solution option 1: install pip_system_certs.
The pip_system_certs is a library that patches requests such that it then uses your system's trusted certificate
store.
While you are in the Python virtual environment where you've previously installed steampunk-spotter, run:
From this point on, spotter will use the same trusted certificate store as the rest of your programs, allowing it to
run against your instance without errors.
Solution option 2: set the REQUESTS_CA_BUNDLE environment variable.
If your trusted CA certificates are in a certificate bundle at a known location, you can store its path in the
environment variable REQUESTS_CA_BUNDLE as a way of telling spotter which store to use:
This StackOverflow comment contains additional information on the topic.
Upgrading from earlier versions of Steampunk Spotter on-prem
For most Steampunk Spotter versions, upgrading from an earlier version happens automatically when you run a newer installer.
From version v5.21.0 on, a migration needs to take place because of backwards incompatibility.
Note
Even if you opt to use docker, the same migration procedure is required, though installing podman-based Steampunk Spotter is advised.
Preparation step
Download our installer as usual and make it executable. If you are currently in the middle of the installation and have not yet gone through the next steps, please exit the installer.
Next, as a regular user (neither as root nor any sudo user), extract the contents of the installer without running
them:
After the extraction succeeds, change to the migration directory inside the install destination.
Create a directory to receive saved contents of your Steampunk Spotter installation, e.g.:
Saving and decommissioning existing application
Run the offboard.sh script to create your Steampunk Spotter installation snapshot and
decommission the installation.
Pass the path to the data destination as the script's parameter:
The script prompts for information on the current installation location, then stops the application and exports its state.
As the last step, it offers to delete the installation directory. It shows on the console the directories that it deletes.
Note
The offboarding script creates a backup file that is tested for proper output structure, so no data is lost.
The Spotter installation directory at /srv is about to be deleted (command that will be run: rm -rf /srv).
Overview of the directories to be deleted:
/srv
/srv/docker-data
/srv/docker-services
Please type 'delete' or the path to be deleted to confirm:
Please make sure to study the list carefully to check that no content other than the application is included. Output of the directories could differ from the list here according to either docker or podman-based installation.
If you are sure that nothing valuable would be lost in the clean-up, type the word delete and press Enter.
To opt out of automatic deletion, leave the response blank or type any other word and press Enter.
Your destination directory now contains the application's snapshot:
New version installation
Installation requires your existing custom.yml file to be referenced in the SPOTTER_INSTALLER_CUSTOM_VARS_FILE
environment variable.
Please refer to Encryption of sensitive data for a correct setup.
Move one directory up and run installation:
On any prompts that follow, type in a suitable answer an press <Enter>.
This installs a new Spotter instance.
Restoring installation data
To restore your previous application's data into the new installation, first change to the migration scripts directory:
Run the restore.sh script by passing spotter home path and path to your installation data snapshot.
As the third parameter, restore.sh expects the word NUKE as a safeguard from destroying any
existing valuable data.
Considering that we have just installed the instance, no new data or scans are at risk, hence using
the word NUKE as the third option is safe.
Note
We are using /srv/spotter as an example of a Steampunk Spotter home directory, your installation
directory may differ.
Pass the spotter home path and dump file location as the script's parameters:
# ./restore.sh <spotter_home_path> <dump_file>                                 NUKE
./restore.sh   /srv/spotter        data/spotter-db-dump-20251203_130940.sql.gz NUKE
If all goes well, your Steampunk Spotter installation is restored, upgraded and ready for use.
License management
Upon your first launch, you'll need to add your Steampunk Spotter license to your on-prem deployment in the Spotter app.
Note
This applies to instance admins only.
Navigate to Admin > License. Expand the sidebar if collapsed.
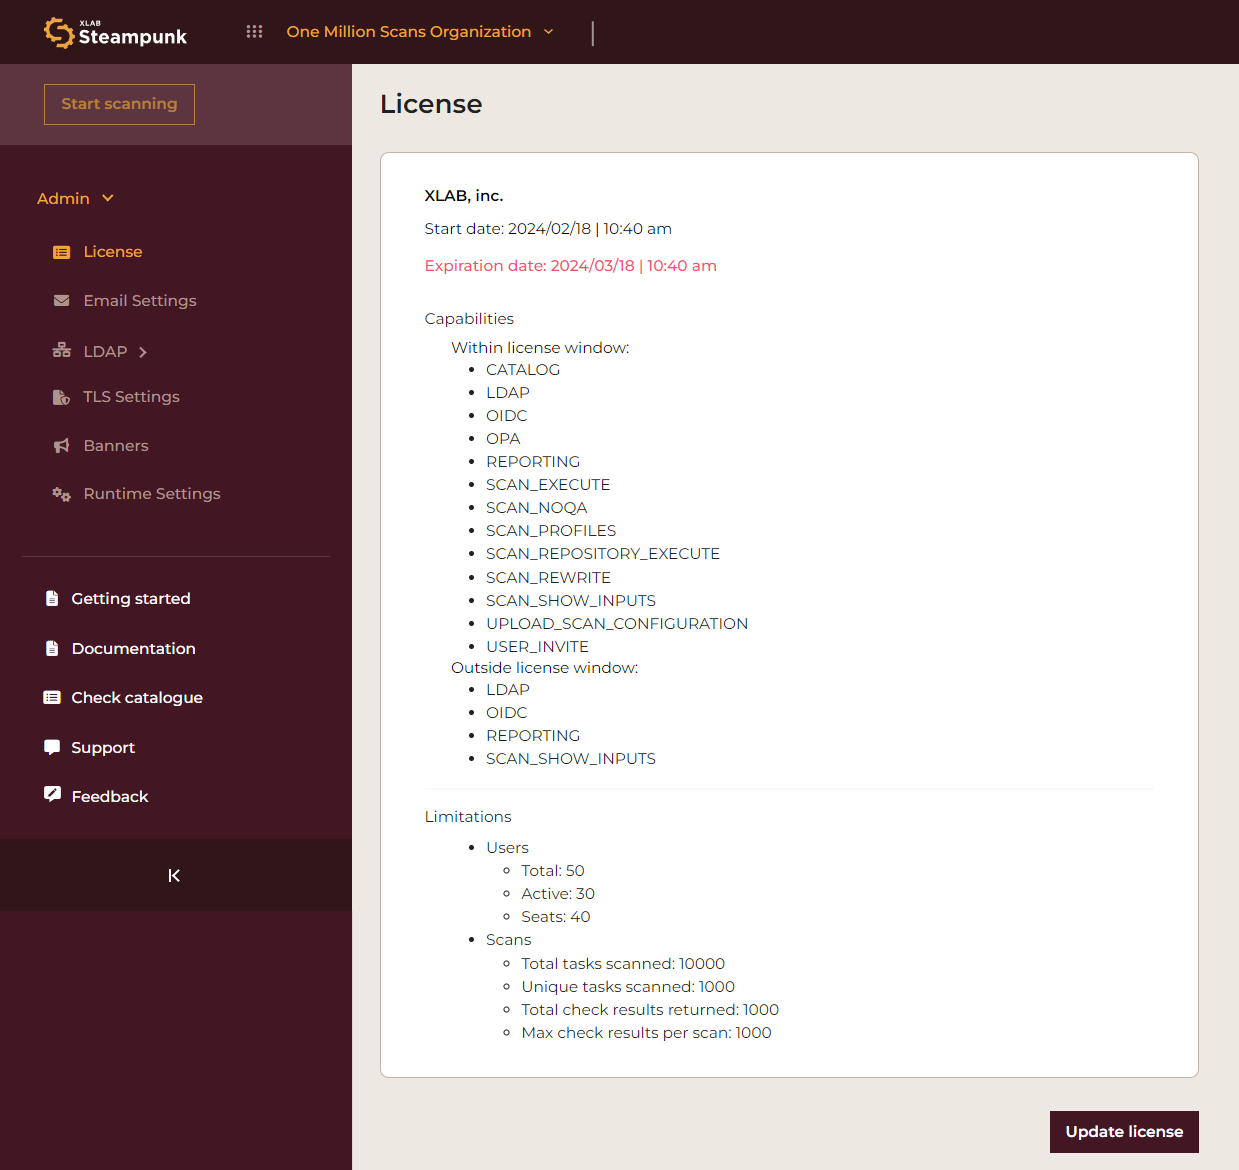
Clicking the Update license button opens the Update license dialog box.
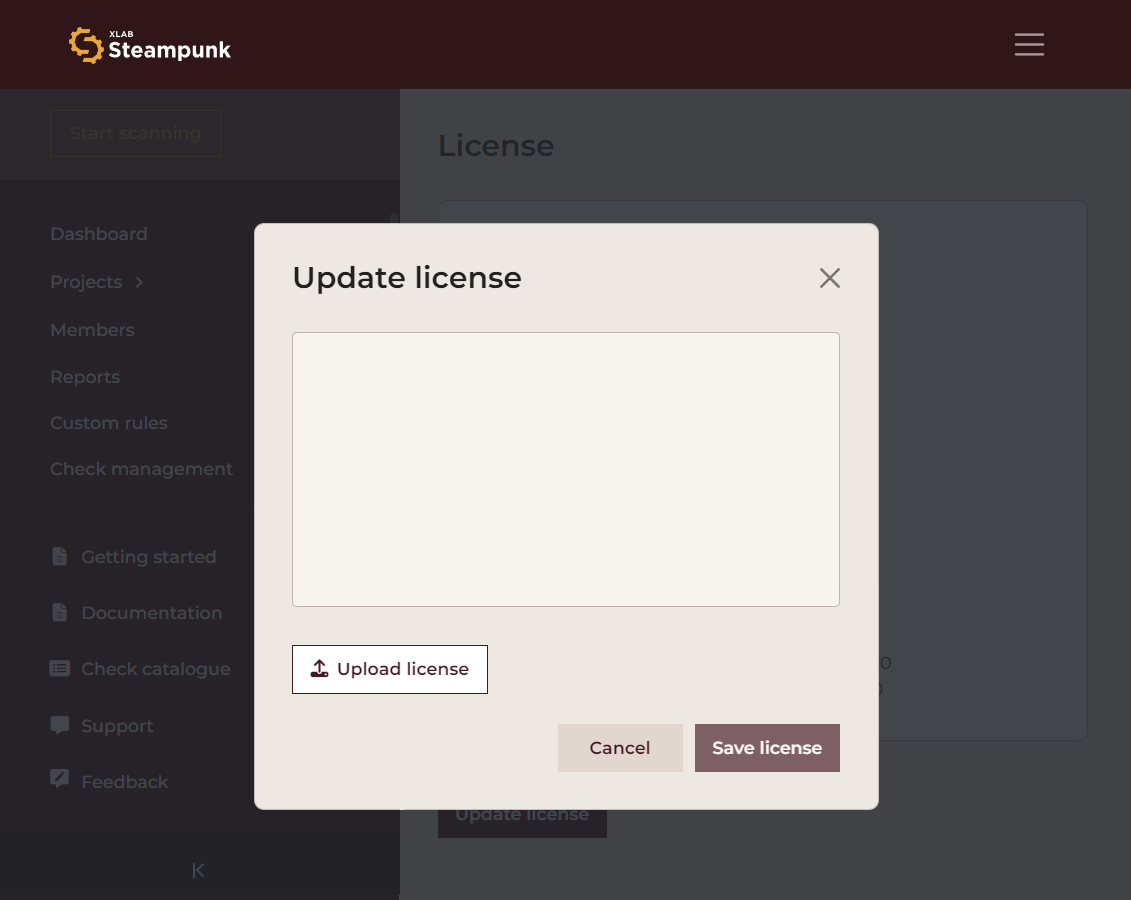
Click Upload license to open your system's File dialog, and upload your license. Alternatively, you can click the empty text box and paste the contents of the license file. Then click Save license to save your settings.
Once your license key is entered, Spotter will verify the integrity and authenticity of the license file. Successful verification unlocks the capabilities assigned to your subscription.
In case of issues with license verification, please ensure the license file has not been tampered with and is correctly placed within the designated on-premises server. For further assistance, contact support with your error logs.
With your license verified, your Spotter on-prem deployment is now ready. Proceed to administer your instance, configure additional settings, and start scanning.
LDAP settings
This section will walk you through the process of enabling LDAP integration within the Steampunk Spotter instance, ensuring a seamless connection and mapping for users and organizations.
Steampunk Spotter encompasses a structured model where users are associated with organizations, each assigned specific roles within these entities:
- Organization admin
- Standard user
A group in LDAP is equivalent to an organization in Steampunk Spotter. In addition to this hierarchical arrangement, we have an 'admin' attribute at the instance level, designated to a select group of users, granting them elevated privileges and oversight capabilities.
Spotter uses the organization's name as a key. Users from multiple LDAP groups are merged into one organization when they are mapped to organizations that share the same name.
LDAP integration - quickstart guide
Before we explore the Settings section, let's introduce a few key concepts to better understand how LDAP integrates into Spotter, using a hypothetical scenario to illustrate these points.
- An LDAP user may be a member of zero or more LDAP groups.
- Conversely, an LDAP group may contain zero or more user memberships.
- A Spotter user is or is not an instance admin.
- A Spotter user may have a permission level (role) relationship with zero or more Spotter organizations.
- Conversely, a Spotter organization may have zero or more users as members, and each member has either a Standard user or an Organization admin permission level (role).
- Each box in the Organization mapping tab represents all the mappings of the users with the same permission level across one or more Spotter organizations.
In LDAP, all the users we want to map into Spotter must have their user entry. But for them to be productive users of Spotter, LDAP users need to be members of Spotter organizations with appropriate permission level (role).
An efficient way to organize LDAP groups is to name them in a way such that a group name contains text to make it apparent that it can be mapped to Spotter; it should contain the name of the mapped organization and the member users' permission level of the members.
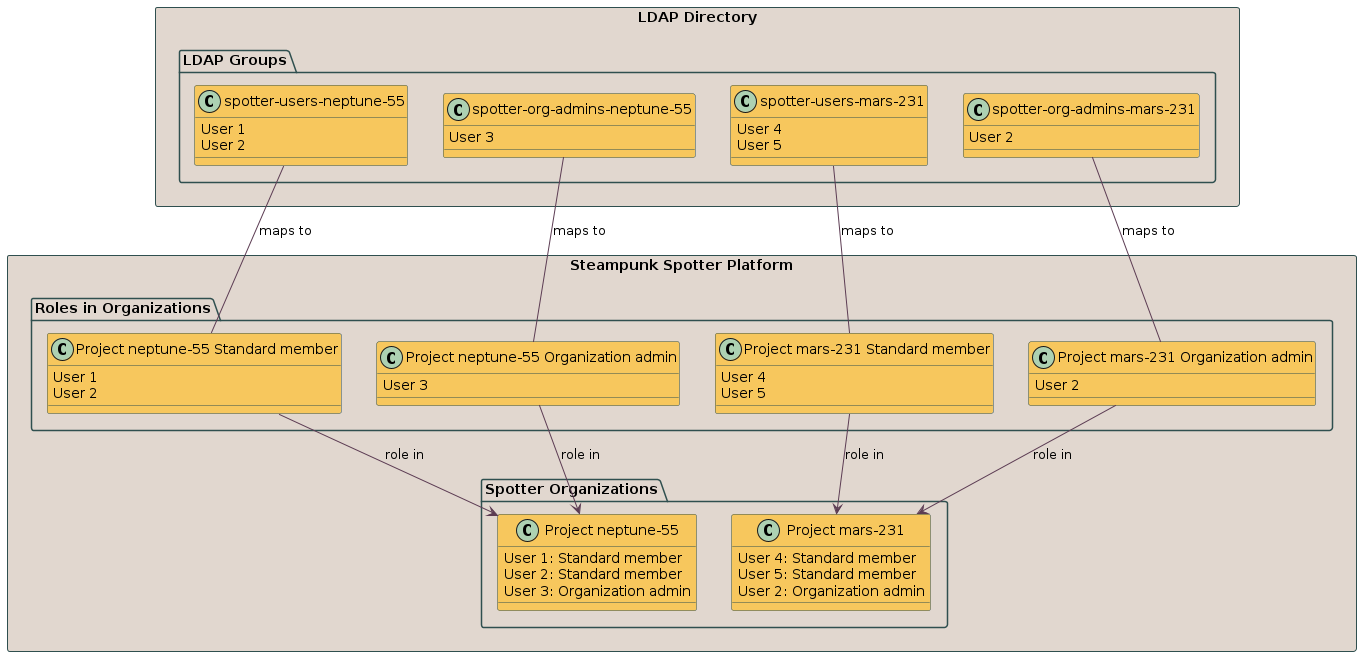
For example, we would like to have organizations named mars-231 and neptune-55. In each of these organizations, we want to designate a small number of users that will have the permission level of the organization administrators. We also set many users up to become standard users in the organizations.
Note
We will use this hypothetical scenario throughout the document to better illustrate how to practically set up your LDAP Settings.
In LDAP, we then name the groups consistently. For example, we prefix the groups for organization admins with
spotter-org-admins-, and the groups with standard users as spotter-users-. This gives us the following groups:
spotter-org-admins-mars-231spotter-org-admins-neptune-55spotter-users-mars-231spotter-users-neptune-55
A visual representation of what we would like to achieve with our integration:
General LDAP settings

- Enable LDAP integration
This enables LDAP integration, meaning that users will have an option on the login screen to use their LDAP credentials. We recommend turning it on once the LDAP settings are valid. It connects your Spotter instance to your LDAP server, allowing for the synchronization of user and organization data. You enable it by ticking the Enable LDAP integration box.
- Sync cronjob enabled
You can enable the cronjob sync by ticking the Sync cronjob enabled. Specify the desired interval (seconds). This enables a periodic automatic synchronization of the LDAP users and groups.
Connection
The Connection tab defines the overarching parameters of the LDAP client running in Spotter.
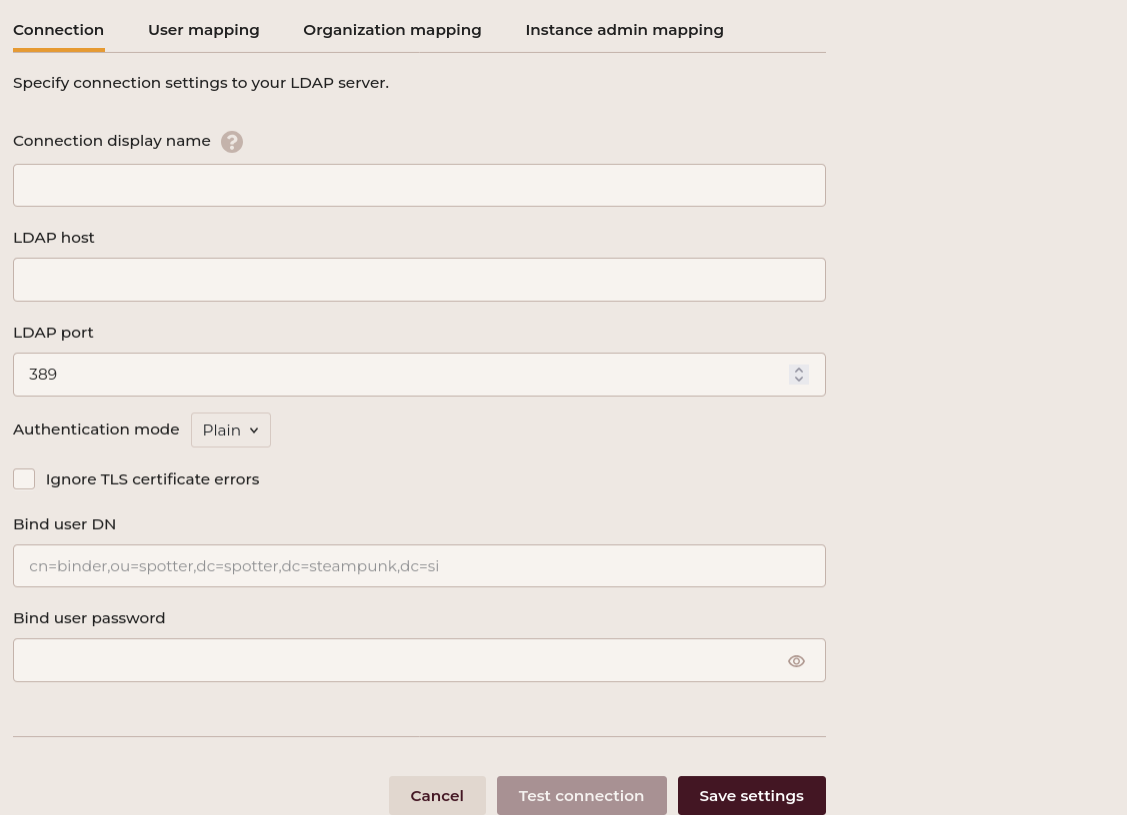
Connection display name
This name will appear as a choice for the LDAP log in on the Spotter App's login page.
LDAP host
Set the address of your LDAP server.
LDAP port
Set your LDAP port. The default port for LDAP is 389. Ensure this port is open and accessible on your LDAP
server. The default port for secure LDAP connections using SSL/TLS is typically 636, ensuring encrypted data
transmission between client and server for enhanced security.
Authentication mode
Set your preferred method of authentication. If your LDAP server uses TLS (Transport Layer Security), you might need additional configuration to establish a secure connection.
- Plain: transmits credentials unencrypted.
- Simple TLS: employs SSL/TLS protocols to encrypt communication, enhancing security by ensuring data
confidentiality and integrity between client and server. This is commonly called the
ldaps://protocol. - STARTTLS: upgrades an existing plain connection to a secure one by dynamically initiating TLS encryption, providing a flexible approach to enhancing data security during transmission.
Ignore TLS certificate errors
Toggle this option if you want to bypass TLS certificate validation. Use with caution, as this might expose connections to security risks.
Bind user DN
Set the Distinguished Name (DN) for binding to the LDAP server.
Example:
Bind user password
Set the password associated with the bind user DN.
Save your settings by clicking the Save settings button. After saving the settings, test the connection by clicking the Test connection button.
Example:
When the Steampunk Spotter performs any LDAP commands in the background, it uses the Connection tab parameters in a manner like the following:
The -ZZ stands for the STARTTLS Authentication mode.
User mapping
The User mapping tab defines the searches that Spotter performs to obtain the list of users to be mapped from LDAP into Spotter, and how these users appear in Spotter.
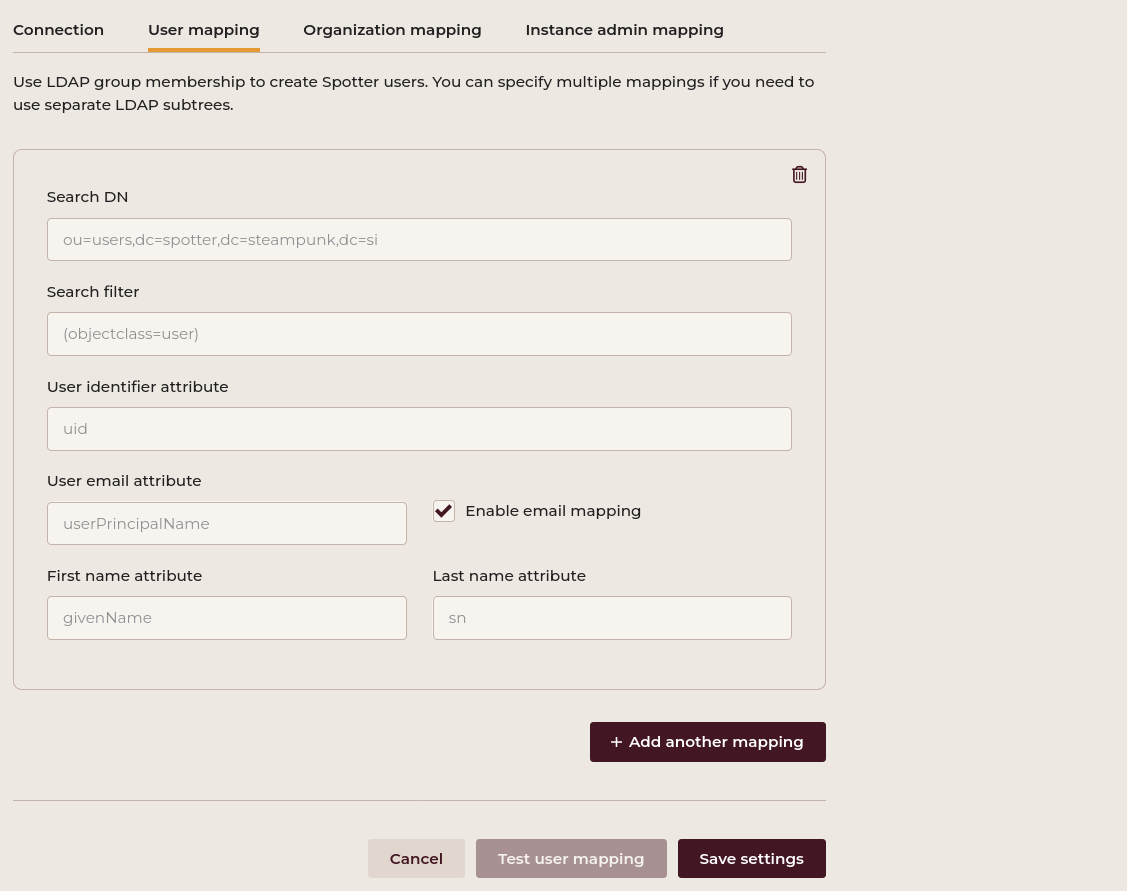
Search DN
Set the Search DN.
Example:
Search filter
Set the search filter to query users within the LDAP directory.
Example:
User identifier attribute
Steampunk Spotter uses this attribute as the user's user name during log-in.
Example:
User email attribute
Set the user email attribute that uniquely identifies the email of users in your system.
Example:
Enable the email mapping by ticking the Enable email mapping setting. If users in your LDAP don't have such an attribute, uncheck this option.First name attribute
Set the first name attribute that uniquely identifies the first name of users in your system.
Example:
Last name attribute
Set the last name attribute that uniquely identfies the last name of users in your system.
Example:
Add another mapping by clicking the Add another mapping button. Save your settings by clicking the Save settings button. After saving the settings, test user mapping by clicking the Test user mapping button.Example:
For finding the correct values to apply to the User mapping settings, we can run an equivalent command that is similar to the following:
ldapsearch -ZZ -H ldap://$LDAP_HOST:$LDAP_PORT -D $BIND_USER_DN -w $BIND_USER_PASSWORD -b "$SEARCH_DN" "$SEARCH_FILTER"
The value of the search filter should ensure that the search results contain only the LDAP users.
In our example, the LDAP entries have an objectClass field set to inetOrgPerson for users. We therefore need to supply
(objectClass=inetOrgPerson) as the search filter value.
As a result, we might obtain a response such as:
...

# User1 Number1, users, example.com
dn: cn=User1 Number1,ou=users,dc=example,dc=com
cn: User1 Number1
uid: user_1
gidNumber: 502
uidNumber: 10101
objectClass: inetOrgPerson
objectClass: posixAccount
objectClass: top
givenName: User1
sn: Number1
homeDirectory: /home/users/user_1
mail: user1.number1@local.si
userPassword:: ********
description: ldap-huge

# User2 Number2, users, example.com
dn: cn=User2 Number2,ou=users,dc=example,dc=com
cn: User2 Number2
uid: user_2
gidNumber: 502
uidNumber: 10102
objectClass: inetOrgPerson
objectClass: posixAccount
objectClass: top
givenName: User2
sn: Number2
homeDirectory: /home/users/user_2
mail: user2.number2@local.si
userPassword:: *******
description: ldap-huge

...
Our user identifier attribute is uid. There is an email field mail, so we enable email mapping and
provide this string as the user email attribute value. givenName provides each user's given name, and the surname is
stored in sn.
The resulting users in Spotter will look like this:
- User with id
user_1, first nameUser1, last nameNumber1, email addressuser1.number1@local.si. - User with id
user_2, first nameUser2, last nameNumber2, email addressuser2.number2@local.si. - Etc.
Each block represents a separate search. Spotter creates a union of these search results and maps a user once, even if the user's entry appears in multiple LDAP search results.
Organization mapping
The Organization mapping is responsible for:
- Creation of Spotter organizations.
- Defining permission levels (roles) that the users from user mapping receive in each organization.
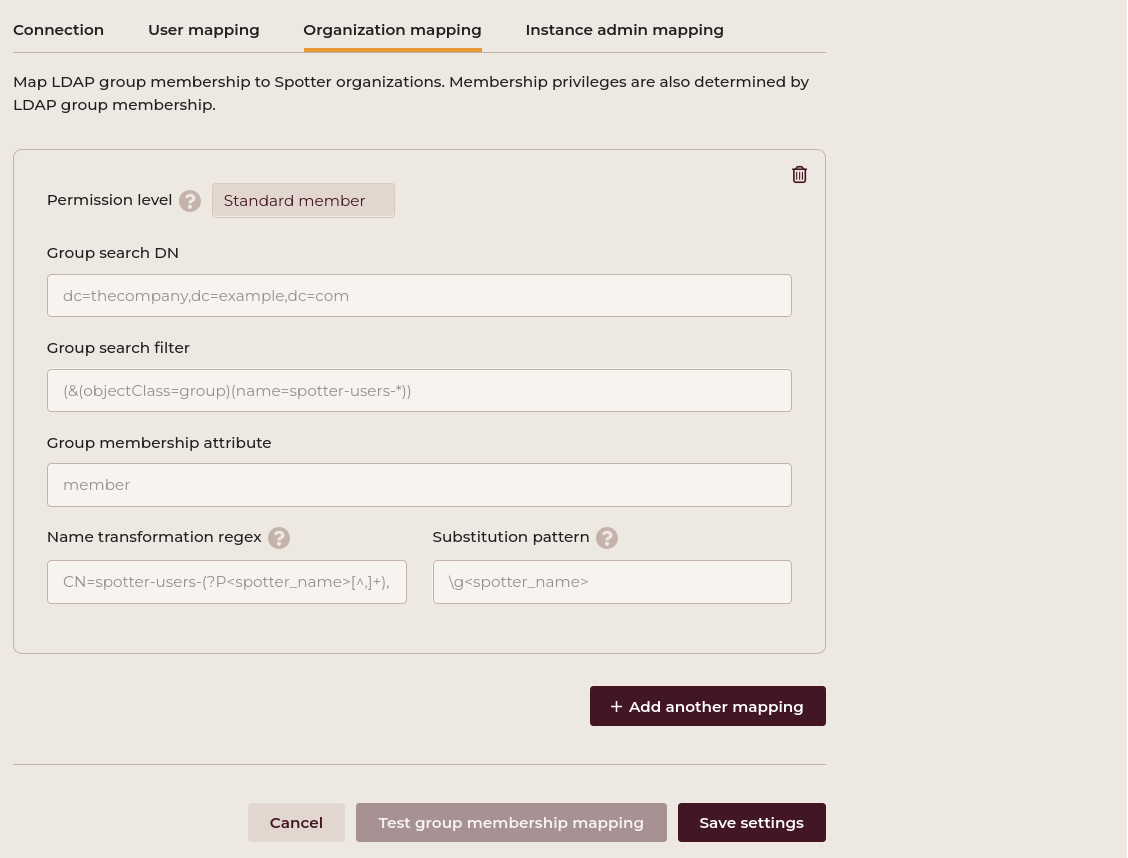
Permission level
Choose your permision level:
- Standard member
- Organization admin
Group search DN
Set the base DN for searching groups within the LDAP directory.
Example:
Group search filter
Set the LDAP filter to query the group search results.
Example:
Group membership attribute
Set the LDAP attribute that represents a membership entry in an LDAP group.
Example:
Name transformation regex
The name transformation regex is an organizational attribute that extracts the organization name from specific data provided by LDAP.
It is a Python-style regex with a capturing group named spotter_name. This group's match is then used
as the organization name.
Example:
Add another mapping by clicking the Add another mapping button. Save your settings by clicking the Save settings button. Test group membership mapping by clicking the Test group membership mapping button.
Substitution pattern
Declare the pattern that will result in the Spotter group name during mapping.
It is a Python-style (re.sub) replacement string. It has the \g<spotter_name> capturing group available for replacement.
Example:
Spotter executes the same ldapsearch command as used for user mapping:
ldapsearch -ZZ -H ldap://$LDAP_HOST:$LDAP_PORT -D $BIND_USER_DN -w $BIND_USER_PASSWORD -b "$SEARCH_DN" "$SEARCH_FILTER"
Since we need groups, not users, the objectClass needs to be equal to posixGroup in our example. But we want to narrow it
down even further and only obtain those LDAP groups that have only the regular users as their members. For example, LDAP groups
spotter-users-Organization1, spotter-users-Organization2, etc. Hence, the appropriate group search filter is
(&(objectClass=posixGroup)(name=spotter-users-*)).
In our example, this gives entries as follows:
# spotter-users-org1, groups, example.com
dn: cn=spotter-users-org1,ou=groups,dc=example,dc=com
cn: spotter-users-org1
gidNumber: 502
objectClass: posixGroup
objectClass: top
memberUid: uuser1
memberUid: uuser3

# spotter-users-org2, groups, example.com
dn: cn=spotter-users-org2,ou=groups,dc=example,dc=com
cn: spotter-users-org2
gidNumber: 505
objectClass: posixGroup
objectClass: top
memberUid: uuser1
memberUid: uuser4

...
- Permission level: "Standard member" or "Organization admin", whichever is appropriate.
- Group membership attribute:
memberUid. This is the attribute that appears zero or more times for each LDAP group, each of which contains a user ID of the corresponding user that should become a standard user of the Spotter group. - Name transformation regex:
cn=spotter-users-(?P<spotter_name>[^,]+). This is a Python-style regular expression that Spotter applies to thednvalue of the group entry. Here, the(?P<spotter_name>...)substring is mandatory, because it represents a symbolic group namedspotter_name. - Substitution pattern:
\g<spotter_name>. This is an exact and specific string that will supply the part of thednstring as matched and captured based on the name transformation regex value.
For the purposes of this example, we will create two search boxes, one for organization admins and the other for standard members. The Group search filter field should contain the LDAP filter that returns only the groups that correspond to the permission level set in the box. In our example, we can use the group name's prefix to do this:
- For organization admins:
(&(objectClass=posixGroup)(name=spotter-org-admins-*)) - For standard users:
(&(objectClass=posixGroup)(name=spotter-users-*))
More information on LDAP filters is available here.
Each box results in a list of LDAP groups representing the target organizations' appropriate permission level.
Spotter uses the organization's name in the mapping, so we need to provide instructions on extracting the part of the
group's name that represents the organization's name. Spotter uses the LDAP group's dn string as a starting point for
this mapping. In our example, the organization admins search box results for the dn portion might look like this:
dn: cn=spotter-org-admins-mars-231,ou=groups,dc=example,dc=com
dn: cn=spotter-org-admins-neptune-55,ou=groups,dc=example,dc=com
cn=spotter-org-admins-[^,]+, because:
- The first part,
cn=spotter-org-admins-matches thecn=plus our group name prefix. [^,]+matches one or more characters that follow the prefix, but the matching stops before any,characters.
This last item matches the part of the LDAP group name that we want to use in the Spotter organization name. Therefore, we need
to augment our regular expression with a Python-specific extension (?P<spotter_name> ... ) so that Spotter will be able to
access the substring of interest by the group name spotter_name.
The Name transformation regex field in our example should contain the following expression:
The Substitution pattern then defines what the mapped organization name will be like. Suppose we would like our Spotter
organizations to be named "Project mars-231" and "Project neptune-55". The "Project" part is common across all the organization names,
and we use the specific string \g<spotter_name> to represent the variable part. So, in our case, Substitution pattern should be
as follows:
This will cover the organization administrators of the mapped organization. To include the standard users, we populate the second box
in the Organization mapping tab in a similar fashion. For them, the dn portion of the LDAP search results in:
dn: cn=spotter-users-mars-231,ou=groups,dc=example,dc=com
dn: cn=spotter-users-neptune-55,ou=groups,dc=example,dc=com
The Name transformation regex field in our example should contain the following expression:
cn=spotter-users-(?P<spotter_name>[^,]+)
The resulting names must be the same as those produced by the first box. Therefore, Substitution pattern is the same as for the first box:
Project \g<spotter_name>
Instance admin mapping
The Instance admin mapping is there to assign the (global, not organization-related) user role of an instance administrator.
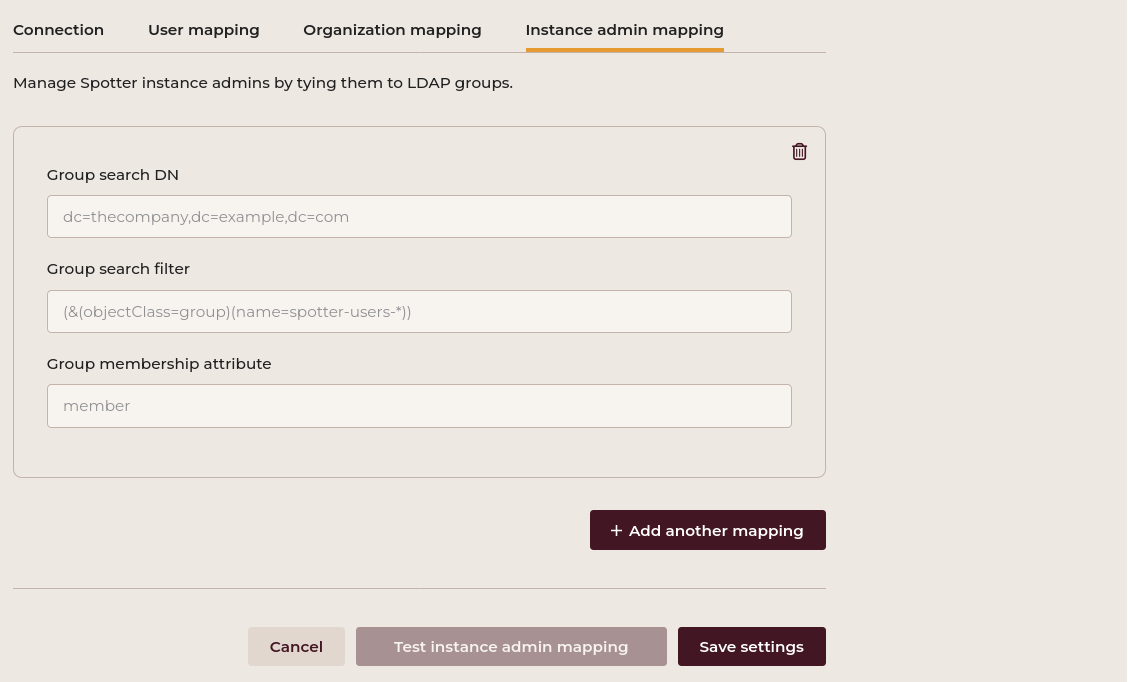
Only users from the User Mappings tab are eligible for promotion into instance admins. If a user does not exist in the User Mappings configuration, they are not created and thus are not an instance admin.
Note
Instance admins are users with a global flag. These users have administrative privileges that are not specifically tied to any particular organization within the system.
Group search DN
Set the base DN for searching groups within the LDAP directory.
Example:
Group search filter
Set the LDAP filter to query the group search results.
Example:
Group membership attribute
Set the attribute name that represents the group membership in the LDAP server.
Example:
Add another mapping by clicking the Add another mapping button. Save your settings by clicking the Save settings button. Test instance admin mapping by clicking the Test instance admin mapping button.Active directory support
To set up an LDAP integration for a self-hosted Active Directory service, follow these steps:
-
LDAP port adjustment: Within the LDAP Settings section of your Steampunk Spotter instance, change the LDAP port value from the default 389 to 3268.
-
Test connection: After adjusting the port, use the Test connection button to verify connectivity. This ensures the application can communicate with the Active Directory server through the Global Catalog over the newly specified port.
-
User and organization mapping: Proceed with the configuration of User and organization mapping settings as outlined in the documentation. Utilizing port 3268 should not affect the mapping process.
See source for additional information.
Support
Contact the LDAP administrator or the Spotter support team for additional assistance.
Single Sign-On Settings
This section describes the process for the instance administrator to configure an on-premise instance of Spotter to use Single Sign-On (SSO). It also describes the use of the SSO once it is configured.
- Navigate to Admin > Runtime Settings.
- In the ribbon under Runtime settings select the Text view.
- Search for the line containing
"oidc_settings".
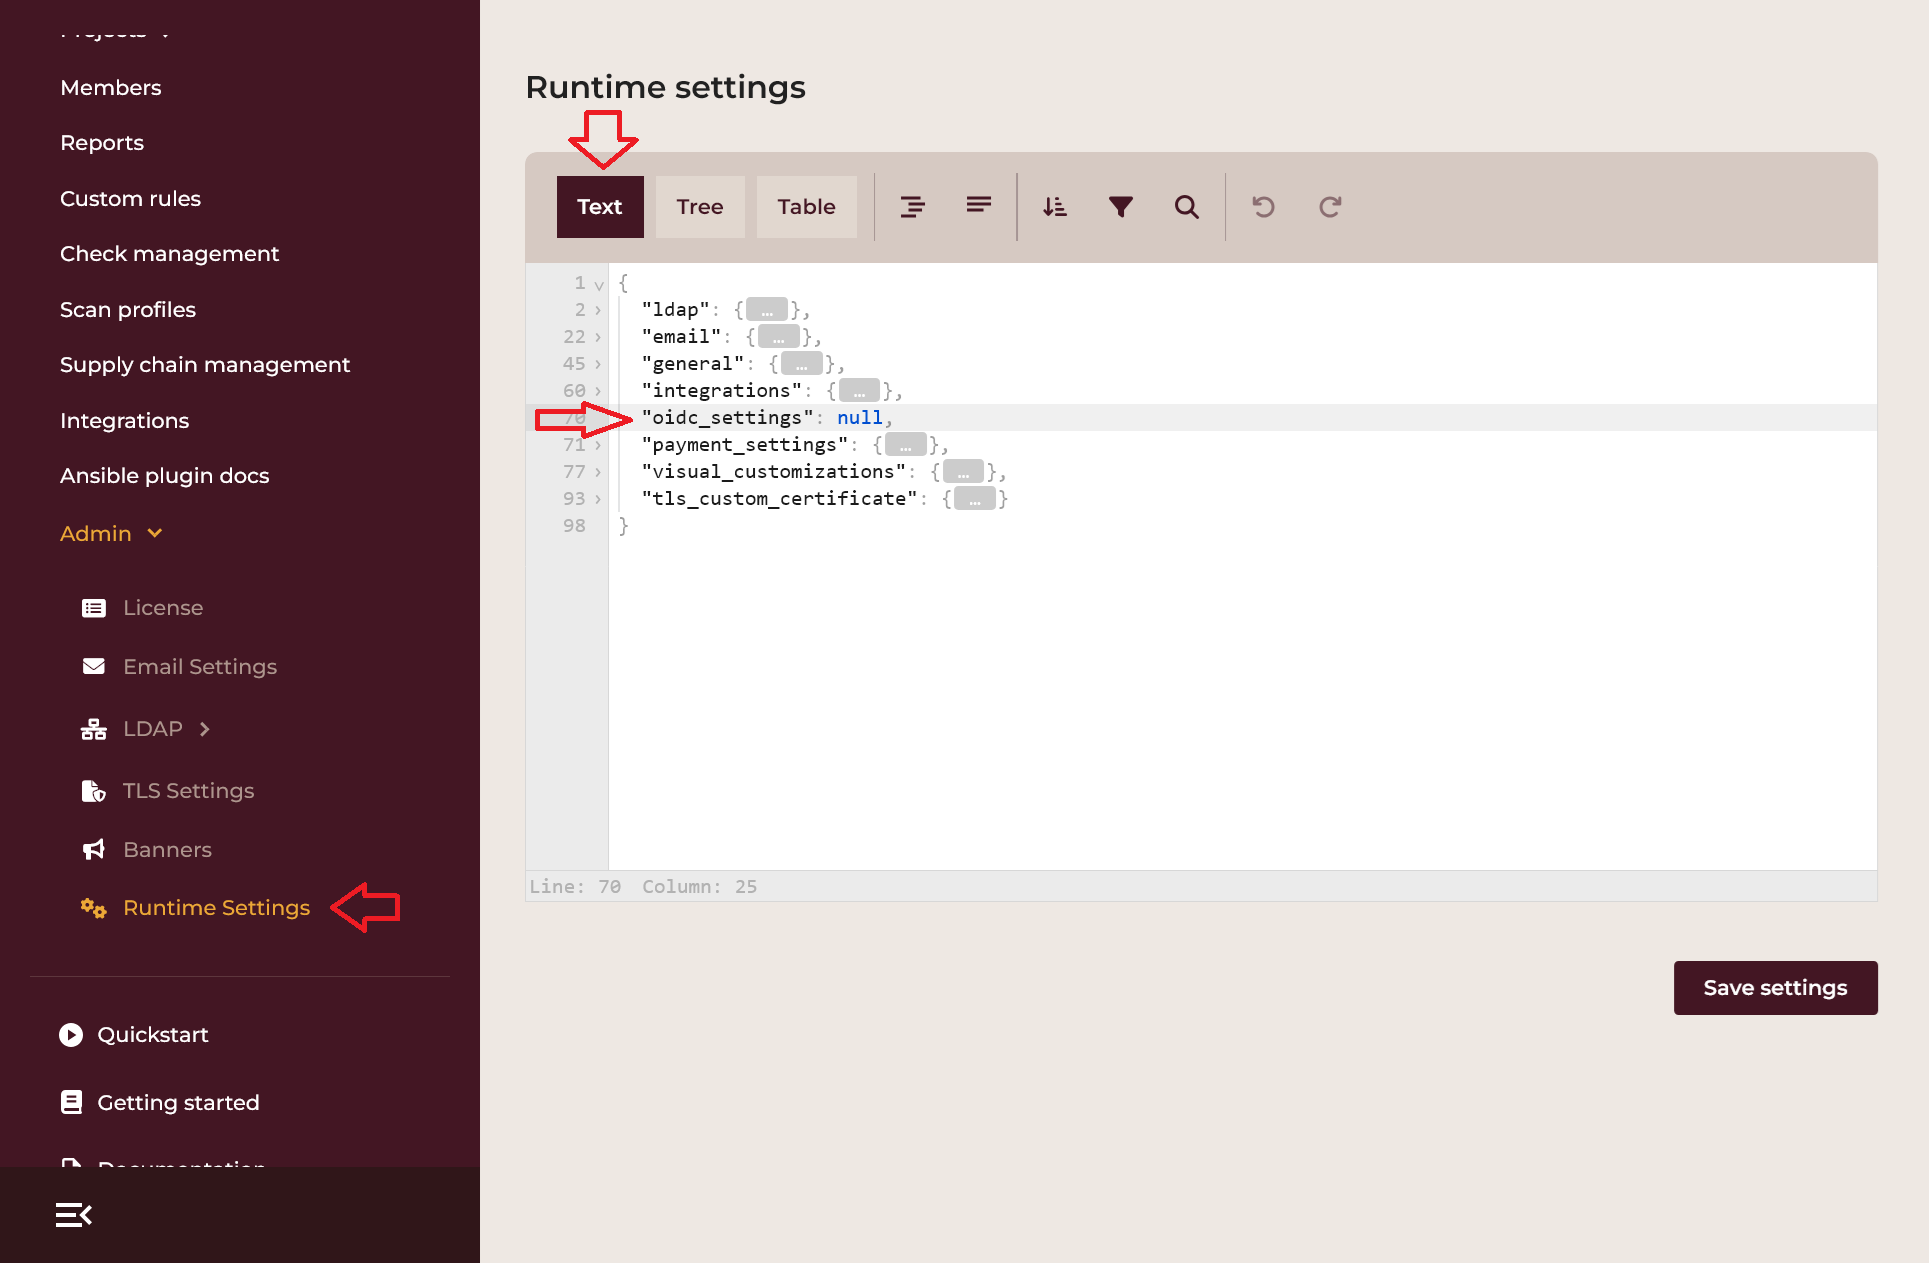
- Replace
nullwith the configuration setting that depends on whether the client is public or confidential.
Public clients
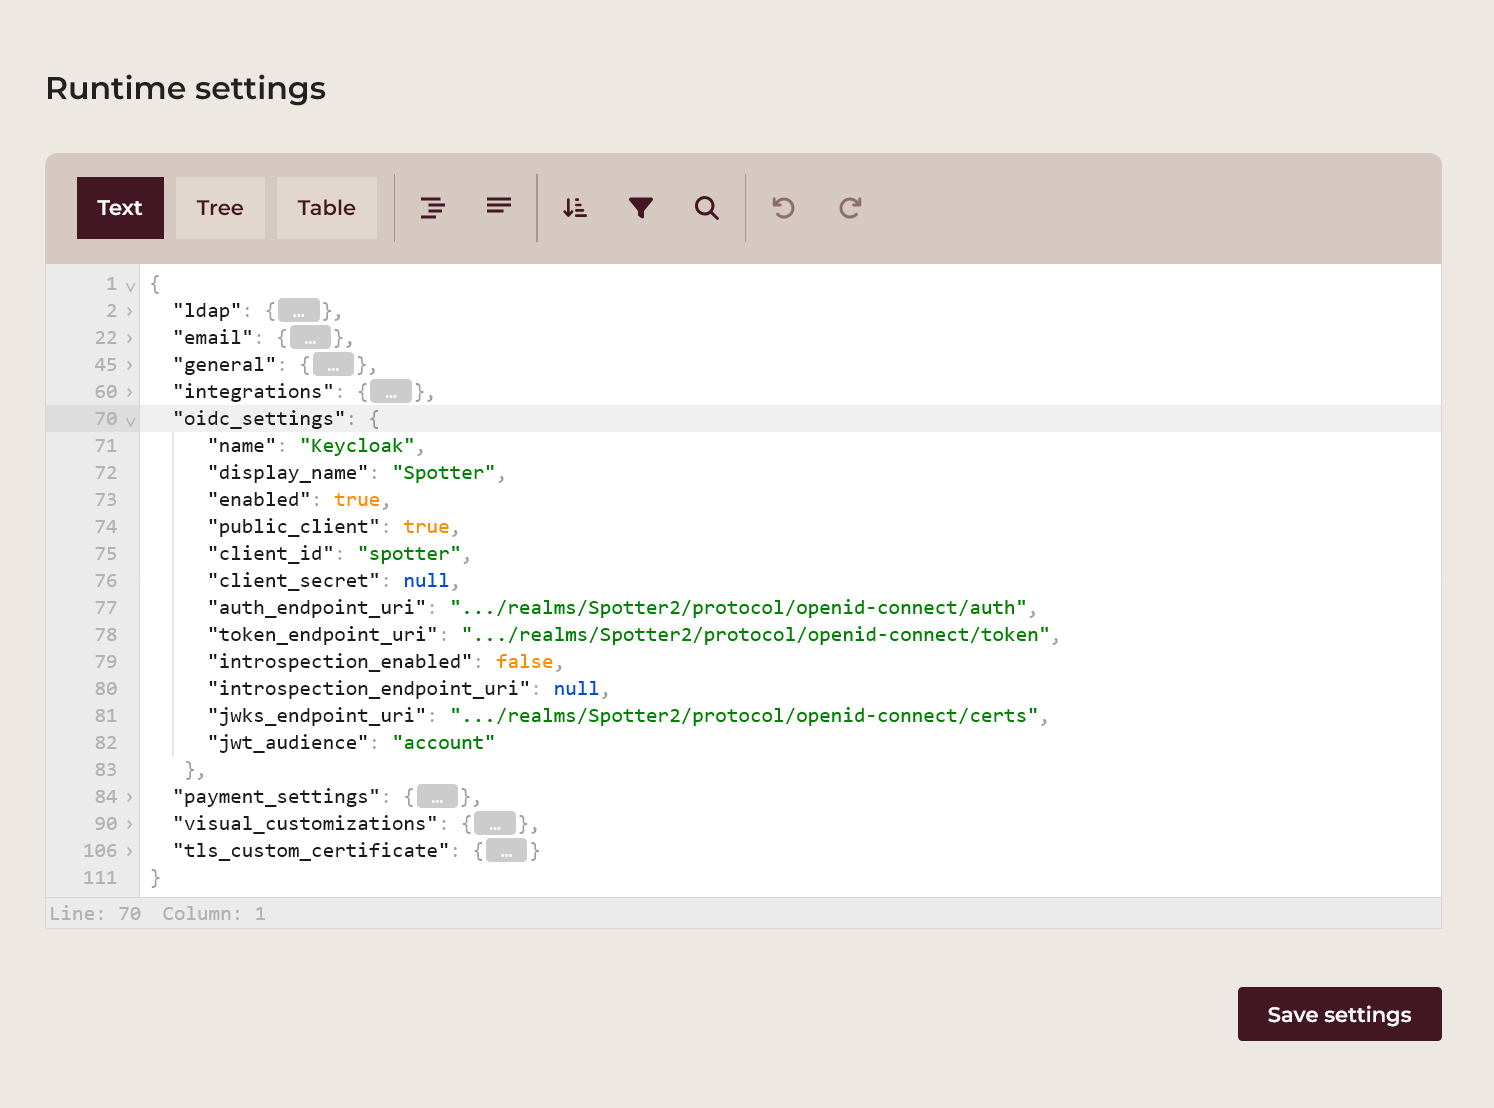
name: this is the internal SSO login provider ID and can be specified by the Spotter instance administrator ("Keycloak" in the example),display_name: this is the friendly SSO login provider name displayed on the login screen button and can be specified by the Spotter instance administrator ("Spotter" in the example),enabled: this is a switch specifying whether the SSO login is enabled; selecttrueif you want to enable it orfalseto disable it,public_client: this is a switch specifying whether this client is public and has to be set totrue,client_id: this is the OIDC client login ID and is provided by the SSO login provider administrator,client_secret: this is the client secret and is not required for public clients, so it has to be set tonull,auth_endpoint_uri: this is the authorization endpoint URI and is provided by the SSO login provider administrator,token_endpoint_uri: this is the login token endpoint URI and is provided by the SSO login provider administrator,introspection_enabled: this is a switch specifying whether the OIDC token is verified through the introspection endpoint (with some OIDC providers introspection endoint can not be used with public clients and has to be set tofalse),introspection_endpoint_uri: this is the introspection endpoint URI and is provided by the SSO login provider administrator (this parameter is optional, it needs to be set only when the introspection verification is enabled),jwks_endpoint_uri: this is the endpoint providing the JWT Key sets (this parameter is optional, it needs to be set only when the introspection verification is disabled),jwt_audience: this specifies the audience for the JWT token (this parameter is optional, it needs to be set only when the audience claim is specified in the SSO login provider's JWT token).scope: this specifies OpenID Connect scope. Depending on your identity platform, possible values includeemail(default),openid,profile,offline_access,addressandphone.
Below is an example template of the configuration:
  "oidc_settings": {
     "name": "Keycloak",
     "display_name": "Spotter",
     "enabled": true,
     "public_client": true,
     "client_id": "spotter",
     "client_secret": null,
     "auth_endpoint_uri": ".../realms/Spotter2/protocol/openid-connect/auth",
     "token_endpoint_uri": ".../realms/Spotter2/protocol/openid-connect/token",
     "introspection_enabled": false,
     "introspection_endpoint_uri": null,
     "jwks_endpoint_uri": ".../realms/Spotter2/protocol/openid-connect/certs",
     "jwt_audience": "account",
     "scope": "email"
   },
Click the Save settings button under the configuration settings. If any of the configuration parameters are not specified correctly, Spotter will issue an error.
Confidential clients
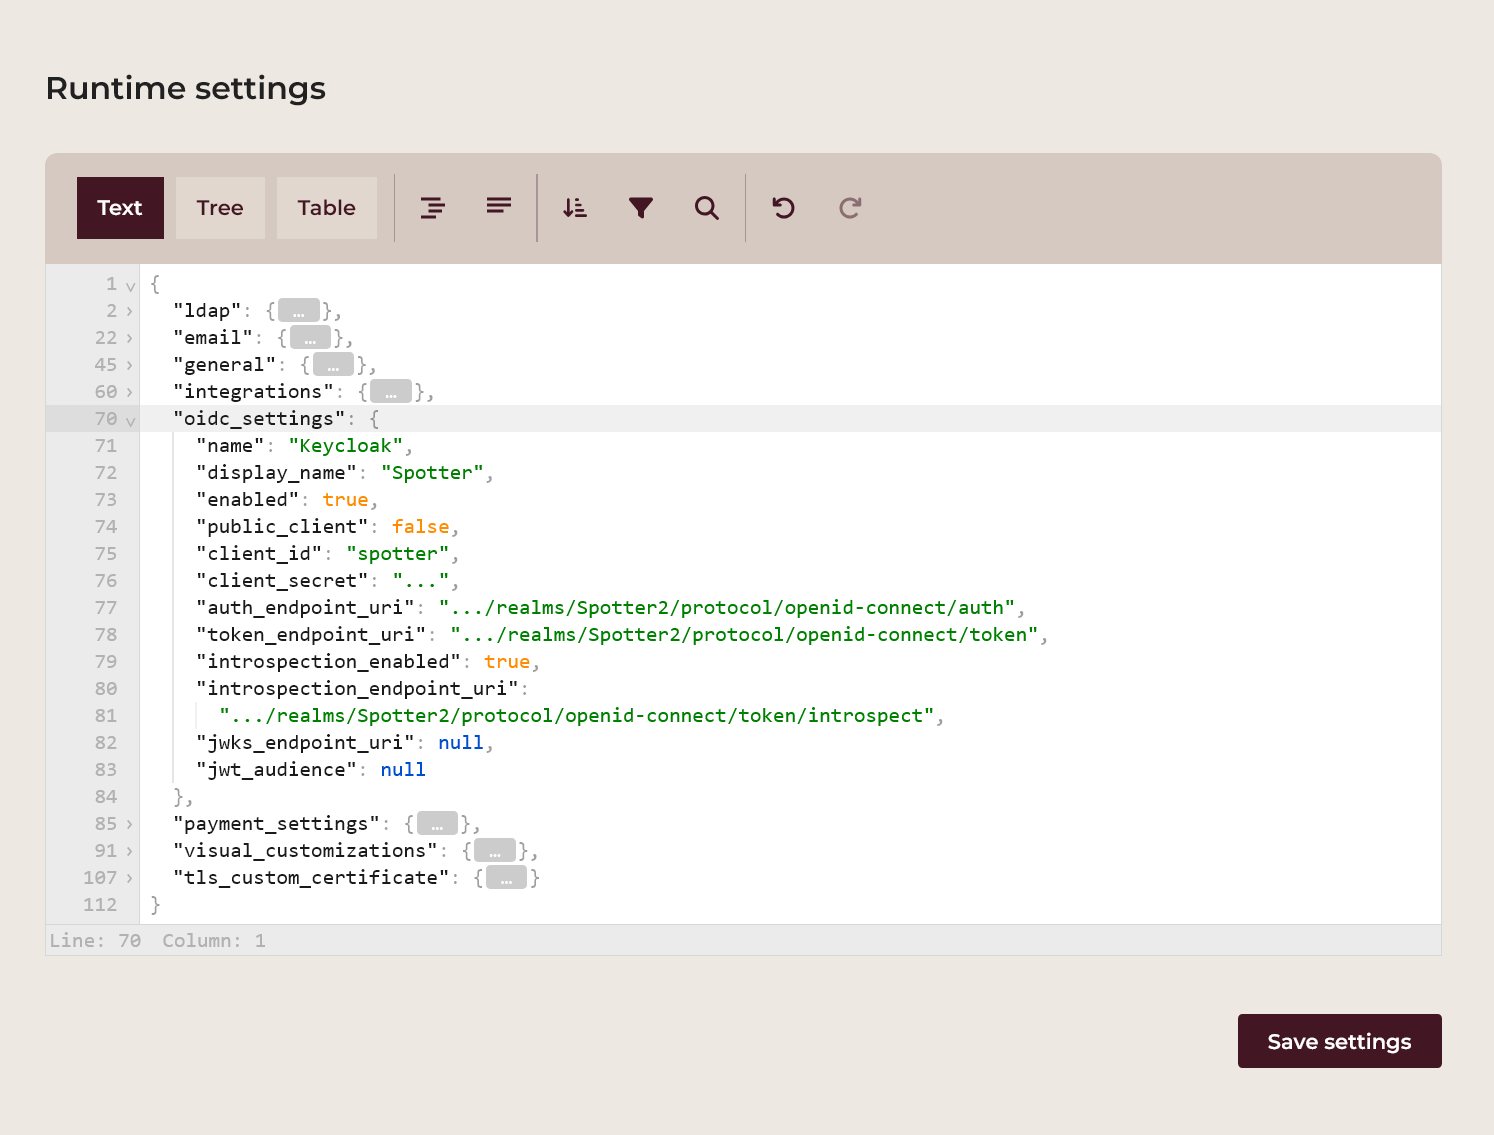
name: this is the internal SSO login provider ID and can be specified by the Spotter instance administrator ("Keycloak" in the example),display_name: this is the friendly SSO login provider name displayed on the login screen button and can be specified by the Spotter instance administrator ("Spotter" in the example),enabled: this is a switch specifying whether the SSO login is enabled; selecttrueif you want to enable it orfalseto disable it,public_client: this is a switch specifying whether this client is public and has to be set tofalse,client_id: this is the OIDC client login ID and is provided by the SSO login provider administrator,client_secret: this is the client secret and is provided by the SSO login provider administrator (this parameter is mandatory for confidential clients),auth_endpoint_uri: this is the authorization endpoint URI and is provided by the SSO login provider administrator,token_endpoint_uri: this is the login token endpoint URI and is provided by the SSO login provider administrator,introspection_enabled: this is a switch specifying whether the OIDC token is verified through the introspection endpoint,introspection_endpoint_uri: this is the introspection endpoint URI and is provided by the SSO login provider administrator (this parameter is optional, it needs to be set only when the introspection verification is enabled),jwks_endpoint_uri: this is the endpoint providing the JWT Key sets (this parameter is optional, it needs to be set only when the introspection verification is disabled),jwt_audience: this specifies the audience for the JWT token (this parameter is optional, it needs to be set only when the audience claim is specified in the SSO login provider's JWT token).scope: this specifies OpenID Connect scope. Depending on your identity platform, possible values includeemail(default),openid,profile,offline_access,addressandphone.
Below is an example template of the configuration:
  "oidc_settings": {
    "name": "Keycloak",
    "display_name": "Spotter",
    "enabled": true,
    "public_client": false,
    "client_id": "spotter",
    "client_secret": "...",
    "auth_endpoint_uri": ".../realms/Spotter2/protocol/openid-connect/auth",
    "token_endpoint_uri": ".../realms/Spotter2/protocol/openid-connect/token",
    "introspection_enabled": true,
    "introspection_endpoint_uri":
      ".../realms/Spotter2/protocol/openid-connect/token/introspect",
    "jwks_endpoint_uri": null,
    "jwt_audience": null,
    "scope": "email"
  },
Click the Save settings button under the configuration settings. If any of the configuration parameters are not specified correctly, Spotter will issue an error.
Using Single Sign-On
When users subsequently visit the login screen, a new Login with <SSO login provider> button appears.
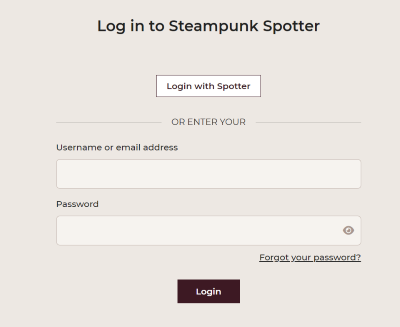
Click the Login with
You are now logged in as the SSO login user and Spotter's dashboard screen appears.
Note
If the Spotter login e-mail address is identical to the SSO login e-mail address, Spotter binds those two user accounts together.
API client authentication settings
This section describes the settings that govern how HTTP REST API clients may authenticate with the Steampunk Spotter service endpoint.
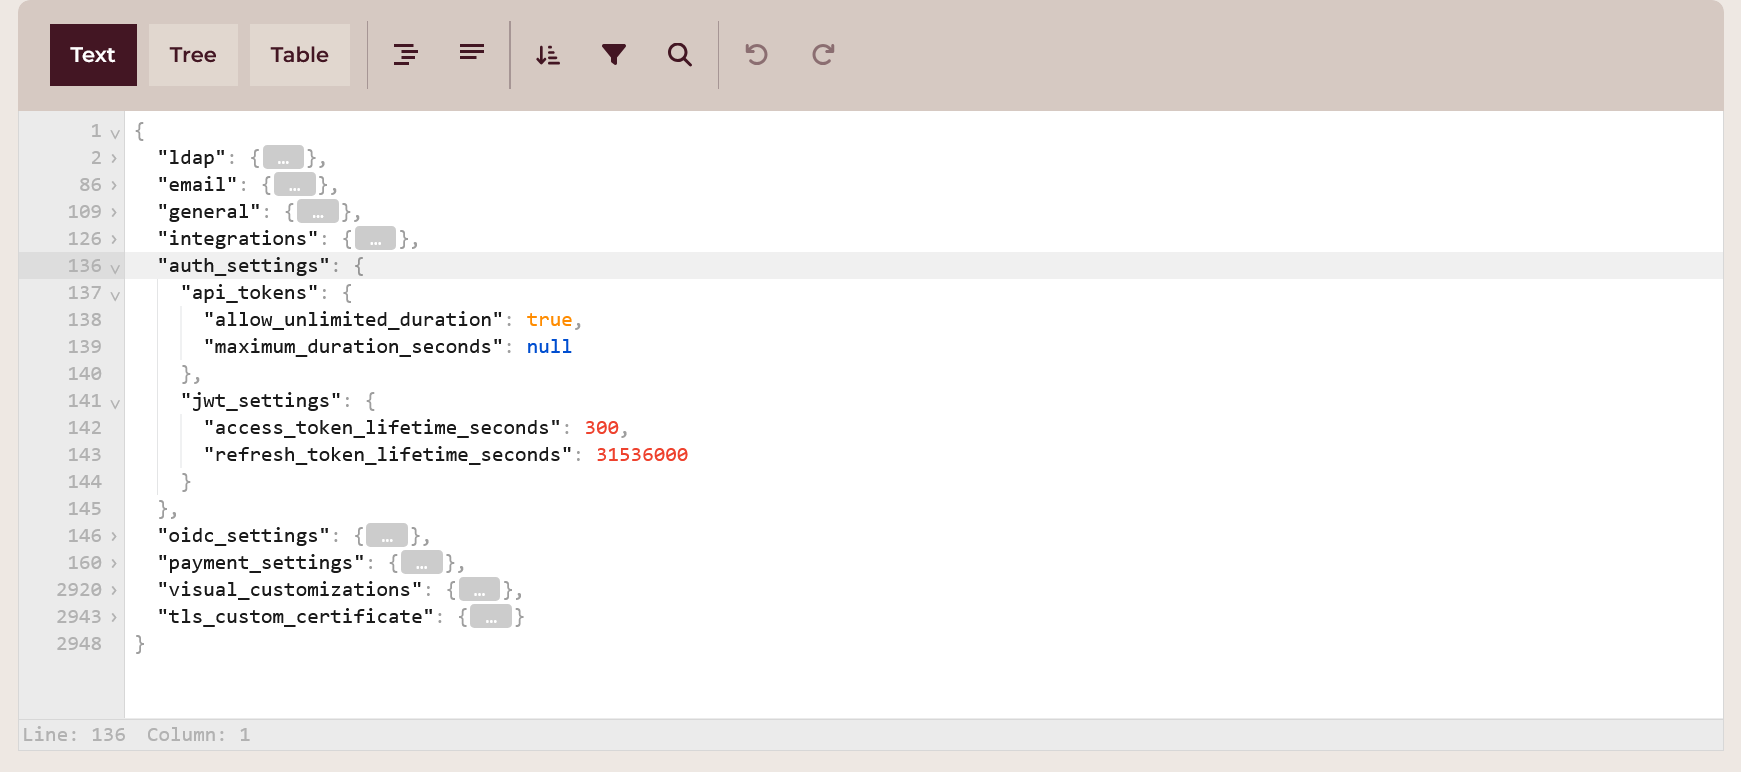
API tokens
API tokens are the means to authenticate with the Steampunk Spotter endpoint. They complement usernames and passwords as credential pairs, and are often used for machine authentication, such as in Continuous Integration.
As a good security practice, the duration of validity of the API tokens can be limited.
Use the auth_settings.api_tokens properties:
allow_unlimited_duration: set totrueto allow for API tokens that have no expiry time. Set tofalseto require that all created API tokens have a set expiry time.maximum_duration_seconds: set tonullwhenallow_unlimited_durationistrue. Set to the number of seconds that will be the longest allowed lifetime of a newly created API token.
Users may create and manage API tokens for their user account in the Web App. See how.
JWT settings
Steampunk Spotter uses the JSON Web Tokens (JWT) technology to maintain authenticated sessions between a client and the endpoint.
The following auth_settings.jwt_settings properties are available to manage the JWT behavior:
access_token_lifetime_seconds: the number of seconds that a JWT access token is valid. After this time expires, the client needs to refresh the token.refresh_token_lifetime_seconds: the number of seconds that a JWT refresh token is valid. After this time expires, a new use of user credentials need to be presented.
TLS Settings
This section provides guidance on configuring Transport Layer Security (TLS) for your Steampunk Spotter service. Follow these instructions to enable HTTPS traffic using your organization's certificate and private key that will be used in communication between clients (the web browser, CLI) and the Steampunk Spotter instance.
If a custom TLS certificate is not enabled, a self-signed TLS certificate is generated and used for communication over HTTPS.
Enable Custom TLS Certificate
Tick the Enable custom TLS certificate to enable the use of your TLS certificate.
Private key (Base64)
The private key associated with your certificate.
Upload the private key file by dragging it from your file manager and dropping it into this field. Alternatively, click the Browse link and select the private key file in the Open file dialog. Standard PKI files are accepted. The contents of the uploaded file will be shown in their base64-encoded form.
For example, if your private key file looks like this:
-----BEGIN PRIVATE KEY-----
MIIJQgIBADANBgkqhkiG9w0BAQEFAASCCSwwggkoAgEAAoICAQC/Oq5wr9pTPhPI
CFT6N++HrMrDE1zAwQvUoW7XbJxyh44JI1Ukfp3SSJEi4qcEq9Q5u2EDB4VWdfen
b37lGk7YRS24GkJyy4y4a8OyP4AGvDtZu6Qs06Rckj0syjaVlN/sUs8lnR9dOvWq
...
LS0tLS1CRUdJTiBQUklWQVRFIEtFWS0tLS0tCk1JSUpRZ0lCQURBTkJna3Foa2lH
OXcwQkFRRUZBQVNDQ1N3d2dna29BZ0VBQW9JQ0FRQy9PcTV3cjlwVFBoUEkKQ0ZU
Nk4rK0hyTXJERTF6QXdRdlVvVzdYYkp4eWg0NEpJMVVrZnAzU1NKRWk0cWNFcTlR
NXUyRURCNFZXZGZlbgpiMzdsR2s3WVJTMjRHa0p5eTR5NGE4T3lQNEFHdkR0WnU2
UXMwNlJja2owc3lqYVZsTi9zVXM4bG5SOWRPdldxCnE4Rm1WbklGTTJyK2Mva0F1
...
Certificate (Base64)
Your TLS certificate, issued by a Certificate Authority (CA). If your setup requires a certificate chain, this file contains a bundle of concatenated certificates.
Upload the public key file by dragging it from your file manager and dropping it into this field. Alternatively, click the Browse link and select the public key file in the Open file dialog. ASCII or binary formats are accepted. The contents of the uploaded file will be shown in their base64-encoded form.
For example, if your certificate file contents look like the following:
-----BEGIN CERTIFICATE-----
MIIGKTCCBBGgAwIBAgIUHlAnRPBv6dAtSAHBvjmB1lLKHrQwDQYJKoZIhvcNAQEL
BQAwgaMxCzAJBgNVBAYTAlVTMRMwEQYDVQQIDApDYWxpZm9ybmlhMRUwEwYDVQQH
DAxTYW4gRnJhbmNpc28xITAfBgNVBAoMGEludGVybmV0IFdpZGdpdHMgUHR5IEx0
ZDEcMBoGA1UEAwwTc3BvdHRlci5leGFtcGxlLmNvbTEnMCUGCSqGSIb3DQEJARYY
aW5mb0BzcG90dGVyLmV4YW1wbGUuY29tMB4XDTI0MDIyMTExMjEzNloXDTI1MDIy
MDExMjEzNlowgaMxCzAJBgNVBAYTAlVTMRMwEQYDVQQIDApDYWxpZm9ybmlhMRUw
Then this will appear in the Certificate (Base64) field as:
LS0tLS1CRUdJTiBDRVJUSUZJQ0FURS0tLS0tCk1JSUdLVENDQkJHZ0F3SUJBZ0lV
SGxBblJQQnY2ZEF0U0FIQnZqbUIxbExLSHJRd0RRWUpLb1pJaHZjTkFRRUwKQlFB
d2dhTXhDekFKQmdOVkJBWVRBbFZUTVJNd0VRWURWUVFJREFwRFlXeHBabTl5Ym1s
aE1SVXdFd1lEVlFRSApEQXhUWVc0Z1JuSmhibU5wYzI4eElUQWZCZ05WQkFvTUdF
bHVkR1Z5Ym1WMElGZHBaR2RwZEhNZ1VIUjVJRXgwClpERWNNQm9HQTFVRUF3d1Rj
M0J2ZEhSbGNpNWxlR0Z0Y0d4bExtTnZiVEVuTUNVR0NTcUdTSWIzRFFFSkFSWVkK
...
Click Save & apply Settings to save your settings. The TLS configuration is applied immediately, so no further action is required.
Support
For additional support or questions regarding TLS configuration, please contact the Spotter support team.
Site settings
The Site settings section of the Admin navigation tree provides options and settings that allow you to further customize the appearance and behavior of your Steampunk Spotter instance. Site settings are grouped by topics.
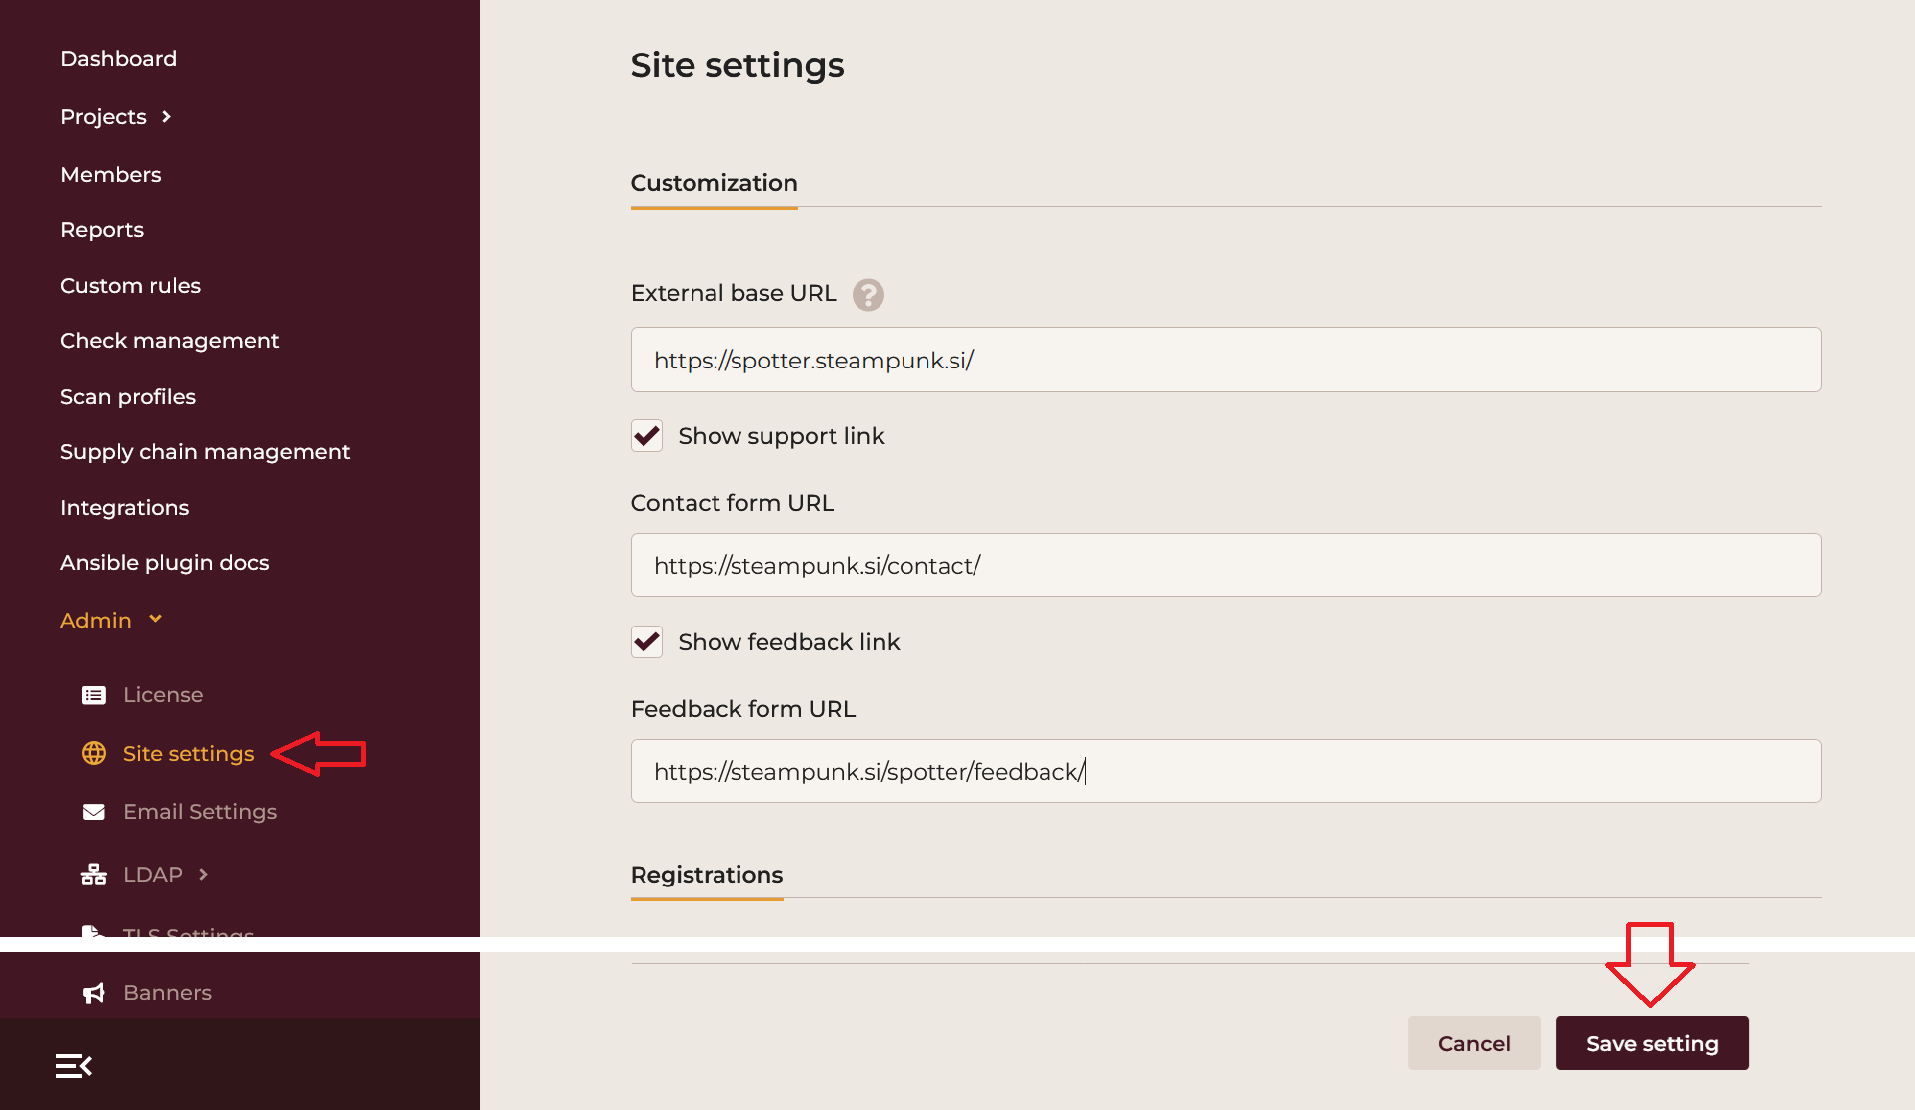
Click the Save settings button at the bottom of the form when you want the modifications to go into effect.
Customization
The Customization section allows you to tailor the Steampunk Spotter App according to your organization's needs.
Base URL for the Steampunk Spotter instance
The External base URL setting is a string that should contain the base URL of your Steampunk Spotter instance. The URL appears in the Spotter CLI scan results, e-mails sent by Steampunk Spotter and elsewhere.
Support and feedback link settings
If your site offers support for Steampunk Spotter, enable the Show support link option. This enables the Support navigation link in the sidebar.
Populate Contact form URL with the URL that this link points to.
If on top of support, your site uses a form to collect user feedback, enable the Show feedback link option.
Provide the URL to the feedback form in the Feedback form URL text field.
Registrations

This section customizes behavior of the registration form.
The Allow registration option configures if the new user registration form is available to public users or not. Tick the box to allow new user registrations. Clear the box to disable the registration form, preventing any new user from manually registering.
Note
Instance admins are allowed to register new users even when this option is disabled.
The Automatically validate registrations option allows the users to log into the Steampunk Spotter App as soon as they finish the registration process.
Clear the option to ensure that the newly registered users are validated first. This means that the newly registered users need to to visit a unique link that Steampunk Spotter sends to their e-mail inbox before the App allows them to log in.
Organization management
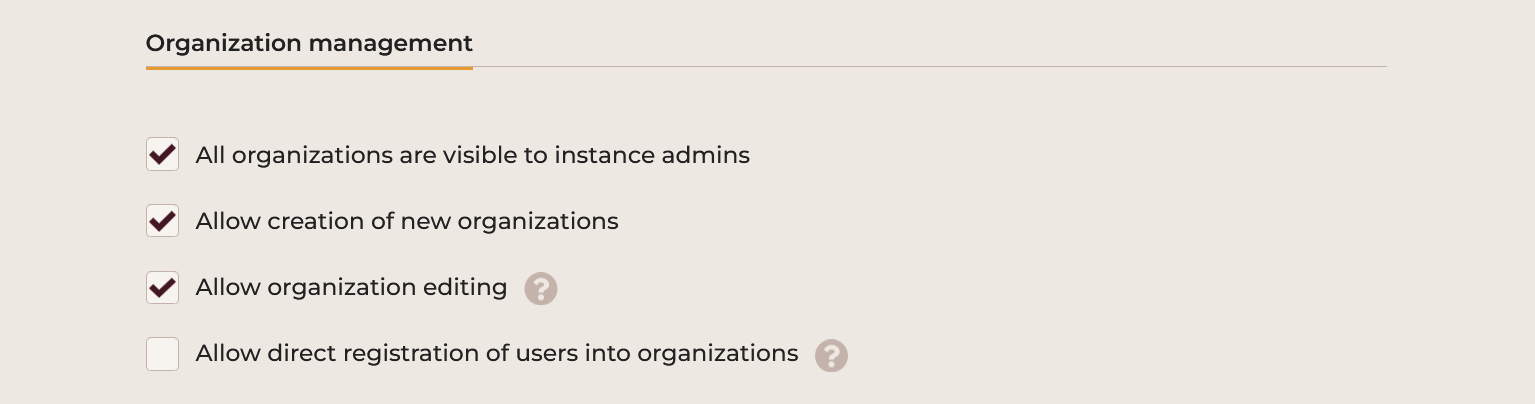
This section governs what information is visible on organizations, and which actions are allowed to be performed on organizations.
Visibility of all organizations for the instance admins
The All organizations are visible to instance admins option configures if the instance admins see all organizations in the Steampunk Spotter instance.
Tick the box to make all organizations visible to the instance admins.
Clear the box to let the instance admins only see their own organizations.
Availability of the organization creation action
The Allow creation of new organizations option controls if the Create new organization button is visible to users in the organizations view.
When disabled, only instance administrators see and may use this button.
Visibility of the Edit organization action
The Allow organization editing option controls if users may see and use the Edit organization action from the organizations list.
When disabled, only instance administrators see and may use this action.
Availability of direct registrations into organizations
The Allow direct registration of users into organizations option, when enabled, adds the Register new user action to the organization's Members view.
When enabled, admins may use this action to register new users, who become members of the organization as soon as the registration form is submitted.
User logins

By default, when users attempt to log into Steampunk Spotter, the username portion of their credentials must be supplied in the exact case as it was registered. The same rule applies for logging in using LDAP accounts.
To disable this restriction, enable the Case-insensitive usernames option.
This will allow users with usernames such as user to be accepted as User or USER or any other
combination of upper- and lower-case characters.
The exact method used to determine matches is Unicode case folding.
Your system must meet certain requirements to allow enabling case-insensitive usernames. See how to ensure these requirements are met.
Client responses

This section provides configuration of the information that is returned to scan clients such as CLI, which allows the clients to display additional information on check results.
Enable the Documentation URL in scan responses option to have the client receive links to documentation pertinent to the check result, when available.
Subscriptions

This section allows customizations to visual and action elements of the Steampunk Spotter subscription management.
Users will see the effect of changing these options the next time they load or reload the application in their browser.
- Show subscriptions page: show the Subscriptions option in the user's top-right menu. Also allow visiting the subscriptions view.
- Show subscription management: if the previous option is enabled, then this option enables action buttons for upgrading organization's subscription and increasing the number of users allowed in the organization.
- Show Add users CTA: show the Add users button at the top of the page whenever applicable.
- Show Try on-prem CTA: show the _Try on-prem button at the top of the page whenever applicable.
- Show Upgrade plan CTA: show the Upgrade Plan button at the top of the page whenever applicable.
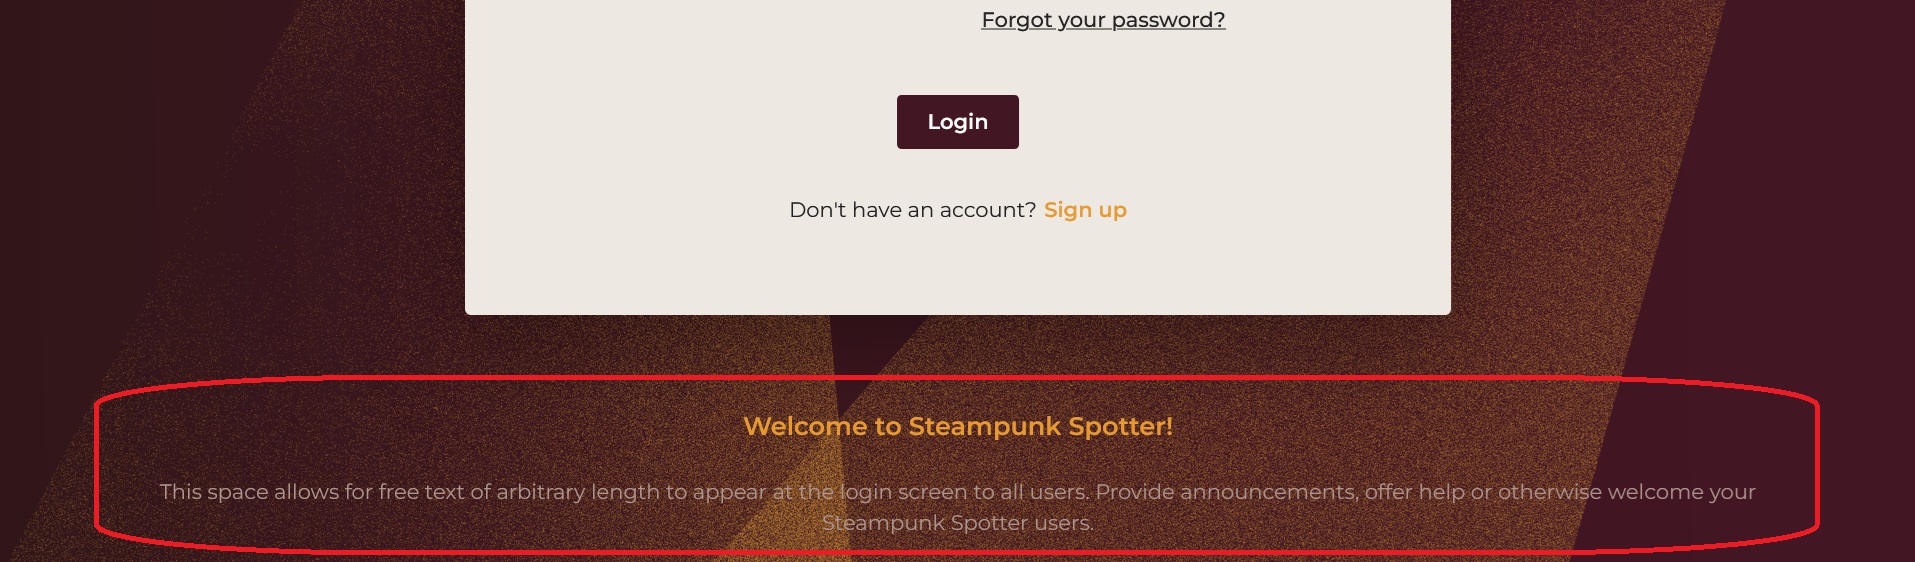
Login banner
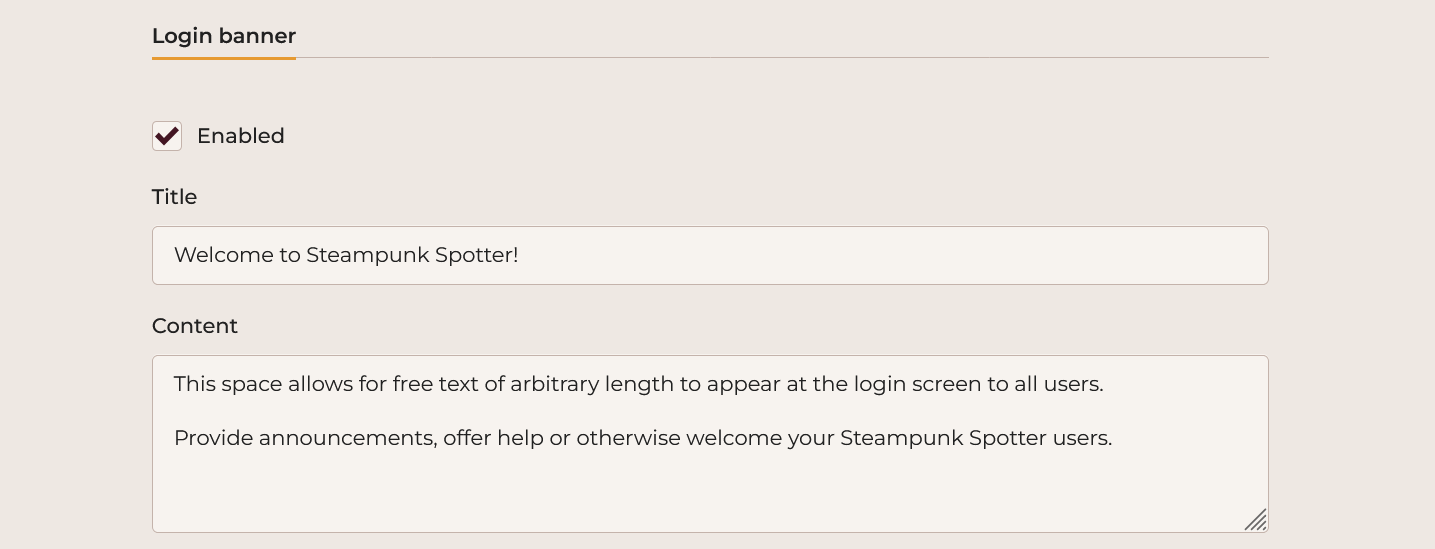
This section lets you control appearance of a banner on the login form view.
The Enabled option enables the banner.
Provide the title text in the Title field.
Provide the body of the banner in the Content field.
To see the effect of these options, use another browser or enter the Steampunk Spotter login screen in the browser's private mode.
Troubleshooting
Installation finished, but I missed the instance admin credentials
If you miss the information about the newly created instance admin credentials, they may be recovered from the installer
log file.
The location and format of the log files is /tmp/spotter-installer-DATETIME.log.
I have lost the log file and I don't have the instance admin credentials
It is possible to create a new instance administrator account.
Log in as root to the host of your Spotter instance.
Then change directory into your chosen installation destination (/srv by default). Then execute the following
commands:
cd config/onprem/
podman-portable compose exec cli ./dev.py --skip-dotenv admin instance-admin create
The command will create a new instance admin user and print the new randomly created credentials.
If you would like to supply your own credentials, include --username USERNAME --password PASSWORD to set specific
credentials.
Warning
Please note that logins into instance admins count towards the maximum users license quota.